Saturday, December 28, 2013

When Excel Gives You Lemons

Earlier this month, I was presenting to a room full of educators. The focus was on all the things that go into communicating effectively with charts. This was certainly no in-depth workshop...we could have spent days kicking around ideas and working through all the questions. It was more of a discussion about why we (in general) do a crap job presenting data when there is so much riding on these.

But, I digress.

After the presentation, someone asked me if I had a "cheat sheet" of what to click in Excel to do some basic tidying up. In other words, if Excel gives you a lemon chart, how do you add a splash of tequila and a dash of salt to make something more palatable? Brilliant idea...and no, I don't have one.

There are lots of great books out there about building effective charts (Read them!), and I won't claim that these can (or should) be condensed into a one-sheet you can post above your desk. But let's say you have five minutes to spend on improving a default chart in Excel. What would you choose? Where do you click on the toolbar? What settings can you change? I'm also going to set aside, for now, how you pick the chart...even though this is really the first step: What story should be told? We'll come back to some tools and resources for that in another post.

So, let's start with some data. You can download the Excel version here. The data are from Washington's Statewide Longitudinal Data System. This table shows the percent of staff and students, identified by ethnicity, for the years 2004 - 2013.


If you select the data and have Excel make you a column graph, here is what you get:
Go home, Excel. You're drunk.


For now, you'll just have to trust me that the line chart version isn't much better, because I want to talk about the options for those sorts of charts in another post. There are a few stories we could pull out of this data set to tell better (e.g. Hispanic students and teachers are the only populations with consistent growth over the past ten years), but sometimes, you have to start with a representation like this so you can figure out where to go with the story.

We're going to accomplish most of our work using the "Chart Tools" in the Excel toolbar--specifically, the Layout tab. If you don't see these, click on the chart and they should appear. You can also right-click on the chart to activate some of the dialog boxes.
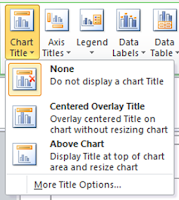

Let's start at the top. We could use a title. And, if there's something specific you want people to pay attention to, you can also add a sentence with that information. As you can see, the default is None. (Thanks, Excel.) Personally, I prefer the Above Chart option to keep things clean. Once you select that, a text box will appear and you will be able to add your title. You can also change the font and its appearance. Note that your chart will resize to accommodate the title. If this skews the overall perspective, just drag things around until the ratios are better.


Okay, how are we doing? It's a start. For this title, I un-bolded the text (it will be bold by default) and took the font size down on the second line, as well as lightened the text to a dark gray, making things a bit easier to read. You don't have to go this far.
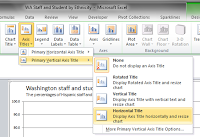


Let's talk axes next. Add them just as you did your chart title, using the next box on the toolbar. I recommend changing the default (bold) to regular text and lightening it up, too. When it comes to your vertical axis, make the choice to have a horizontal title. Although Excel will dump it in an undesirable spot, we can drag it into place. The thing here is that we're trying to make it easy for your audience to read the axis label. Don't make them tilt their heads like dogs to read sideways text. It doesn't take any more time to label it correctly from the start.

Now, let's move the legend to above (or below) the chart. I prefer to do this because it orders the legend the same way as what's shown in the chart. Like making the axis titles horizontal, doing so with your legend will ease the burden on your audience.

In about 10 clicks, we now have a chart that looks like this:


We still have plenty of time for a few more fixes. Let's attack those axes. Bring up the dialog box.

There are three options I almost always make use of. My purpose here, like un-bolding text and lightening up font colors, is to change up the data-to-ink ratio. That is, if the data are the stars of the show, then make them stand out. The lines and labels are important, but are supporting players. They can still provide value while being part of the background.

For both the horizontal and vertical axes, I remove the tickmarks and change the line color to a light grey. For this chart, I also change the numbering of the vertical axis so there are no digits after the decimal. Our purpose here isn't to have people notice the difference at that level. It may also be useful to play around with the units for the vertical axis. Do we need to have it cross at every 10...or is every 20 or 25 percent enough? I'm leaving things at 10, even though I think it's a bit busy, it also helps provide some better context about the size of the populations and their relative changes.

After I close the dialog box, I also click on the axis itself and lighten the font and reduce its size.

Finally, let's lighten up those gridlines. Some people would argue that you could eliminate them in most cases.

So, another 10'ish clicks, and we've really made some headway.


Yes, it's still a bit of an ugly duckling due to the default color choices of the bars, but if you had to run down the hall to a meeting with this, you'd be okay. You've added lots of context with your labeling, made the overall chart easier to read, and showcased the data.

When you have a style that you like, remember that you can save things as a template. Very handy for those times when you're asked to pull together some data on the fly.


In our next post, we'll take a look at the basic line graph settings. Later, we'll get into choosing a story for this data and exploring some color options. Y'all come back now, ya' here?

Bonus Round
Do you have a few more minutes to play with this chart? Without changing the style of the chart, what else can we do to make it tell the story a bit better? I know, it's a challenge...especially when we should probably spend more time developing a different chart for our story. But let's give it a go. I know many of you are often so pressed for time, you just have to go with the basics.

What about doing something like this?


In this case, select all the columns and change their fill to grey. Then, select the individual bars you want to fill. You can add data labels (and even add supplemental text to show the years) to provide additional context. Finally, delete the chart legend and change the colors in the chart title to match the fill color in the bars. In another 20 clicks, we've helped direct our audience a bit more.

You can download the anatomy of this redesign (pdf) here.

Download Me
In five minutes or less, you can take a basic column/bar chart in Excel and make it more meaningful for your audience. What other formatting would you apply?

Sunday, October 27, 2013

A Tale of Two Tumblrs

As Dickens might have said, had he been around today, "It was the best of viz...and the worst of viz." Or, as my mother might have said, "If you can't be a good example, you'll just have to be a horrible warning." You get the idea.

Two new tumblrs are collecting examples of data visualizations. One, called Thumbs Up Viz, posts examples of visualizations done well. I especially like this one on Kindergarten Readiness by Stephanie Evergreen (excel tutorial here).

by Stephanie Evergreen of Evergreen Data
It hits all the right sweet spots for me. A title that summarizes the chart, with a subhead that provides context. A dot plot that recent research suggests is superior to bar charts. Labels close to the data (which are set on a common scale). Good use of colour. Thumbs up, indeed. For those of you on teh twitters, there is also a #thumbsupviz tag you can follow or use to share your own excellent finds.


At the other end of the spectrum, there is WTF Visualizations for "Visualizations that make no sense." For example...

http://wtfviz.net/image/64871769069

Um, yeah.
There has been some chatter about whether this tumblr is appropriate/productive/okay. Is it just making fun...and if so, maybe that's not very nice. While I agree that if that is the point, it's not very nice. But the educator in me sees opportunity here. I've built many a set of exemplars in my time, and I have to say that bad examples are often better for discussion than good ones. What feedback would you give? How would you change instruction to support better work next time? What would make this visualization "good" and why? Outstanding work makes for great examples and models, but doesn't always lead to the kind of conversation we need about how we work with data. Maybe we need something more like Carto-Critique on Wired?

What do you think? How would you use these to guide your own work?

Friday, May 3, 2013

When a Young Woman's Fancy Turns to Thoughts of Excel

You might remember my Shaggy Dog story this winter about efforts to get an interactive workbook online. Even after I found a solution and did my happy dance, the project got shelved...with the caveat that we could pursue something in the spring. Well, it's spring and we're no closer to being allowed to put the project online; however, this may have been a good thing, because it has given me an opportunity to completely revisit things and derive a more elegant solution.

A couple of weeks ago, David Napoli shared this link to a Metro Style Dashboard by Erik Svensen. And while I couldn't directly use the information (I don't have Excel 2013 yet), it did get me thinking about how to update the look of my project---and more importantly, it let me know that slicers work with the Excel Web App.

Slicers, you ask? If you're new to Excel...or if you are still using a pre-2010 version...you might not have seen these. They go along with pivot tables (a piece of Excel magic that we haven't talked about in this space) to "slice" (filter) your data set into all sorts of views. It's probably easier to show you, so my example is below. It uses the same spreadsheet as the Shaggy Dog.

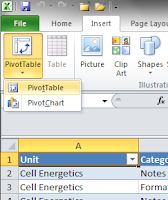
Start by highlighting the first cell in a table, then from the Insert tab, choose Pivot Table. When prompted, I added the pivot table to a new worksheet. This is the easiest way to wrangle your table, because it will be a dynamic item. Depending upon what you want to look at, the items showing in the table will change.

On the left is my pivot table...to the right of it is a dialog box I can use to build the pivot table. Notice that the headings from my original table (Unit, Category, Title, Description) are in the list of fields. I picked the first three for this project. Excel automatically placed them as rows, but I could drag these into any arrangement or hierarchy that I want.

I should share that this pivot table is unusual in that there are no numbers associated with it. Most people use pivot tables to look at the results of different groups...and this is very handy for teachers looking at student data, too. But for this project, I only have text. We'll talk about building pivot tables for your other data in another post.

Okay, now I can add Slicers. If your pivot table is highlighted, you can insert slicers from the Options tab on the ribbon.
Otherwise, just go to the Insert tab and choose "Slicer." You'll get a dialog box---just like the fields from the pivot table---to choose from. I picked the first two options this time, so here is what Excel gave me:
Slicers are like remote controls for your pivot tables. By clicking on any combination of buttons in the Slicers, you can call up any combination of data from the table. They also can move around in the workbook, meaning we can add them to a reporting tool. The defaults on the Slicers, like most things in Excel, are not very sexy. But, fear not, there are a lot of ways you can dress them up.

Now, I can build a report. I'm not going into the full details in this post, but you can download the workbook if you want to see the innards. With the exception of the pivot table and the interface you see below, it's all the same data set and formulas as the Shaggy Dog. I moved my Slicers and built a simple display.

The slicers are on top, in a two-by-two arrangement. Depending on the buttons selected, the list of items changes. Better yet, you can upload this workbook to a SkyDrive account and put it on the web. Like this:


You can click the "View Full Size Workbook" button in the lower right corner of the window if you don't want to deal with the scrolling. (When you embed workbooks, you can change the size that shows, but we have some other design constraints here based on my blog design.)

This is a very simple application, but you can certainly take it a lot further. The one I (re)built for work has a block of color to show the user how many resources are available. If you used a tool like this to get a view of what was happening across classes (or classrooms), you could also build it out with a variety of charts or other visuals.

It's spring. Get out and play!

Sunday, March 17, 2013

ASCD 2013: Meet the New Data Tools

They're the same as the old data tools. 

I'm at a conference this weekend. It's ASCD's annual conference. For those of you unfamiliar with this organization, it's mission is to develop "programs, products, and services essential to the way educators learn, teach, and lead." It is my all-time favourite conference and the place where I get the greatest amount of professional learning.


Like most conferences, there is an exhibit hall here...a place for vendors to strut their stuff. I like a brisk walk through the aisles. I don't like stopping long enough for a badge scan (and the ensuing spam in my inbox), but it is always good to see what the trends are. Or, if you're like me, keep an eye out for what's happening with data visualization options for education.

Spoiler alert: It isn't pretty.

I should clarify here and say that there are no data viz tools specific to education. Rather, I was looking for software that helps capture and report educational data: gradebooks, course/content management systems, and so on.

The first two things that caught my eye were meant to be more traditional tracking/reporting tools. I talked to reps from each company, asking them about the development process for their products. When I specifically asked who determined what their reports looked like, they said "our software engineers." I pushed a little further---didn't they have anyone with data viz expertise at least provide some input on things? Nope. End of story...so I moved on.

The third vendor had a content management system for teachers to build online lessons. It was connected to a reporting tool that could show the teacher progress, notes, etc. I had a lengthy discussion with a rep here, not because their stuff is particularly good or bad, but rather about the theory that underpins the need for the software. For example, they had previously built a "standards-based gradebook" based on teacher input...only to discover that the tool didn't represent best practices in grading. What had happened was that the teachers wanted to say they were doing that sort of grading, but in name only. The philosophical differences that should have driven the tool didn't get implemented. Ah, a company that is starting to wise up. Their visualizations for teachers were okay---better than I had seen, but nothing that knocked my socks off.

As I was leaving the exhibit hall, I ran across one tool that did. And it pains me to say the name, because there is so much else I do not like about the company...but it's Pearson. Good use of sparklines...well-selected color schemes...even some bean plots to show some of the distributions. Someone has been providing good counsel on what the best charts are to use for the various forms of data in the system, and I applaud that.

I'm still keeping an eye out for additional tools for schools. If you've found a vendor that you think deserves a shout-out, let me know and I'll add them to the list!

Saturday, January 26, 2013

Getting It All Laid Out

One of the MOOCs I'm currently enrolled in is Alberto Cairo's Introduction to Infographics and Data Visualization. So far, it's familiar territory, which is nice. Some things are new to me, but I am not overwhelmed because everything is new to me. It's a six-week course. We're starting the third week and have our first offline assignment.

Imagine that you report to me (your managing editor in a news publication). You wish to make a proposal for a visualization based on these numbers. How would you convince me that your idea is relevant? You will need to show me detailed sketches (made by hand or through a design program) to do that.

By "these numbers," he is referring to these data about the changing number of tenured faculty at U.S. universities. I've downloaded the data, but I'll need to do some more reading and digging before I'm ready to do something with them. I have to figure out the "So what?" before I draw up a presentation of the data.

In the meantime, I thought I'd share a bit about the process I use when building a data display...something I worked on this week.Over the next month, I'll be sharing some data with groups of small districts. The data is not so much a report---they already have some of it in various forms---but something to explore in common. These groups of districts will be trying to identify some common ground as a starting point for some work together.

I started by finding all of the data I could about these districts: fiscal, staff, and student-level. Then I pared down the data sets by thinking about what the audience would want to see. Next, I got out my pencil and some scrap paper. It was time to draw some scenarios. I think that even if my digital tools weren't limited to Excel, I would still begin with an analog model. I like to list the types of things I want to show and then figure out how to arrange them. Mind you, this is only a starting point. I often find myself in the middle of developing something, only to find out that it didn't make sense after all.

Finally, I get knee deep in Excel. For this project, I ended up with three different displays: one that showed overall trends in student performance, another to dig deeper into performance in various subject areas, and a demographics overview for each district.

Here is the first one of the series. I am still struggling with it in terms of whether or not to go with clustered columns instead. Such a display does make it easier to compare data over the years, but since I am including both regional and state level data for three different years, clustered columns get a little busy. The reason why I am leaning toward the version shown is that it is easier to compare patterns between the region and state.
There are things I don't like about this display, so if you have some ideas about fixing it, I'm all ears. For example, I'm not convinced about using different colors for the bars in the top row, but since I'm not going with the clustered columns, I think the color helps make comparisons across the years. I really don't like the labels along the bottom set of charts. I suppose I could shorten them and then create some sort of legend that gives the real version. There are two choices a user can make in the interactive version of this chart. They can pick a subject area (reading, math, writing, science) and grade level (3 - 8)---so not all of the labels are as cumbersome as they are for reading.

The second display shows trends for graduating cohorts---although these students may be many years from walking across the stage. The purpose of this display is to look at performance for the same set of students. For example, how did a group of fifth graders score when they were in fourth and third grades? The current grade levels of students are in parentheses.


It's a little busy. Mind you, you need a big monitor to view the spreadsheet all at once. I've tried to be as consistent as I can with the color scheme, headers, etc. I do think that the small size of the graphs is a bit misleading---some of those gaps are as much as 20 points. Users can hover the cursor over points to see the numbers associated with them.

Finally, here is a sample of the district overview.

It's the only one of the three that doesn't have comparisons, but in this case, it should be okay. It will serve as a reference when teachers from each district talk about their schools. I have some stacked bar charts here to help conserve space, but I've tried to keep the style more or less the same. I know that the more I fuss over the details, the less they will be in the way of others making sense of what is presented.

For me, these sorts of designs are a slow process. The last graphic took me most of a day to derive. Sometimes, graphs don't turn out in the way you think they will. Or they take more space. As hard as I try to be consistent with colors, labeling, and fonts---there is always something I miss. Sometimes, I build something only to find out that I don't need it. And, no doubt, the day after I share these, I will see two or three other ideas I wish I would have incorporated. But I'm feeling pretty good at this point in the build.

Now, about those tenure data...guess I've procrastinated long enough...

Wednesday, January 16, 2013

Where's Frankie Avalon When You Need Him?

Image credit
MOOC-y school dropout,
No certificate for you.
MOOC-y school dropout,
Can’t do R-stats worth a poo.

Okay, so maybe it's not quite that dire. But my first big programming assignment for my R-stats class is due in 30 minutes...and after many hours over several days, I still can't get even the first part of it to work properly.

Baby don't sweat it (Don't sweat it),
You're not cut out to write a script.
Better forget it (Forget it),
Who wants a program that can’t do shit?

I'm not really dropping out, but I think I will be giving up on my dream of completing the class in good stead. There are only two more weeks, so I will keep up with the lectures and quizzes...maybe poke around in the programming innards some more (even if I can submit the assignment). I will learn what I can and not lose sleep over the rest.

I'm a pretty good problem solver when it comes to messing around with formulas. I understand how to go out and Google for help and find YouTube videos I can follow along with. But those skills aren't serving me well with R-stats. Perhaps another course will help push me along.

I've called it quits, 
to bytes and bits, 
They really made me cry!
Think I’ll be going back to spreadsheets in the sky…

Tuesday, January 8, 2013

Mind the Gap

I want to share an idea I saw at a conference last month. Presented by Paul Stern of the Vancouver Public Schools, it was one of two very intriguing concepts for working with assessment data. Fair or unfair, schools are the subject of a lot of comparisons---how well they perform against other schools in their area, state, or even nationally and internationally, as well as internal comparisons that look at scores from year to year. We can think of lots of reasons why these "apples to oranges" discussions are cagey---everything from the populations schools draw from, to the curriculum used, to teacher quality, parent involvement, and so forth.

Perhaps the biggest of these---in terms of what school staff discuss or dismiss---is the percent of students eligible for free/reduced lunch (FRL). Often used as a measure of poverty, the greater the percentage in a given school, the greater the population living at or below the poverty line. There are some quarrels with using this. For example, the percentage decreases as grade levels increase---that is, there are far more students in kindergarten who are eligible vs. high school seniors. This may be due to underreporting at upper grade levels (a kid doesn't want to appear different in front of peers, and so the paperwork doesn't get turned in), or simply that as children age and become more independent, it's more likely to find two working parents outside the home (and therefore more income). But, we'll set this aside for today's discussion.

So, here's a chart that will serve as the starting point for us.

The dots on this chart represent every school in the state of Washington for which data were available on performance of 8th graders on the state math test and percent of students eligible for free or reduced price meals. The dark orange trendline tells us about what we'd expect: the greater the percent of students eligible for FRL, the lower the percentage of students meeting the standard (a/k/a "passing the test"). They straight beige line shows the statewide percentage for meeting the standard on the 8th grade math test.

Looking at this might engender some questions about schools that don't fit the overall model. In the lower lefthand corner, we have schools with a low percent of FRL...but poor performance on the test. And in the upper righthand corner, we have a few schools with a large percent of FRL, but are doing better than the statewide performance. What are those schools doing, I wonder?

But let's say that you're in a large district, like Seattle. It's likely there are conversations about students achievement at the middle school as it relates to poverty, but we can dig deeper than that. We might expect a certain level of performance, based on the model shown above. But using the model to supply a context will allow us to remove poverty from the discussion---in other words, what is the gap in performance between the predictive model and the actual score?

Here is the same chart, with Seattle schools highlighted (click to embiggen):


As we can see, some schools, are below the trendline---they didn't score as well as predicted. Others are above the trendline---they performed better than predicted. To help visualize this a little better, let's zoom in on two of the schools.


The arrows point to the predicted performance of McClure and Pathfinder. Based on their percentage of students eligible for free/reduced lunch, we would have expected them to score around the state level (~55%). However, McClure scored 13 points above this...and Pathfinder 6 points below.

We can also build a chart to take a broader look at the various gaps between predicted and actual performance. Using the handy-dandy formula for slope that Excel provides for this trendline (y = -0.362x + 68.088), we can substitute the percent of FRL for x and find the predicted performance based on the trendline (y).

See? Your Algebra teacher knew learning about slope would come in handy someday.

Using one of the stock charts in Excel, we can visualize this to get a better idea of the differences in performance.The schools are organized, left to right, by their predicted performance. The dot at the end of each line represents their actual performance. The length of the lines shows the difference.


This chart helps us see things in a new way. For example, Madrona has the highest percentage of FRL out of these schools, but their gap in terms of expected performance is certainly not as big as Cascade or Orca. Hamilton has the lowest percentage of FRL and the highest actual math scores in the district, but it is not the school that best outperformed expectations. This also allows us to see that schools like Jane Addams and Madison, while still performing below the state average, are outperforming expectations (if only by a small margin). We don't celebrate our successes nearly enough in education. Maybe that's because we don't look for them like this.

Again, the idea here is to remove poverty levels as the focus for explaining the differences between schools. Doing so allows us to look for deeper answers about curriculum and instruction. This is not to say that socioeconomic status has no impact---just that dismissing low performance because of is not the whole story.

I've used public data available here to model these charts, but you could substitute other indicators. Education is certainly not all about the test---and schools shouldn't be judged on a single measure. But I do think that this could be a powerful starting point for schools and districts.

Saturday, January 5, 2013

Learning All the Time

Over the next two months, I am participating in three different Massive Online Open Courses (a/k/a "MOOCs"). It's good to remind myself now and then that the edge of my rut isn't the horizon. It's time for me to make my brain hurt again.

I've taken online courses before, but never with so many classmates---and not in such a low-stakes way. Although I want to make the best effort I can, not paying for the courses (or having them show up on a transcript) gives me a bit of an "out," if I get overwhelmed.

Here is what I've signed up for:

Computing for Data Analysis
This course started on Wednesday and runs until January 30 (and has ~40K people enrolled). Taught by Roger Peng from Johns Hopkins, the description states that "this course is about learning the fundamental computing skills necessary for effective data analysis. You will learn to program in R and to use R for reading data, writing functions, making informative graphs, and applying modern statistical methods." Yikes. I haven't had an ounce of formal programming coursework since high school---you know, back when BASIC and the TRS-III were king. But I hear about R a lot and am curious about how to use it. It's time for me to get on board.

So far, so good. I've completed watching the lectures for week one and have taken a ton of notes. I'm almost finished with the first programming assignment/quiz---just one question left that has me stumped. I know how to solve it with Excel. In fact, the entire assignment would be much easier (for me) in Excel. But I am trying not to "cheat" by doing it in Excel first and then checking my answers in R. I need to know how to program...and the only way to do that is to get my hands dirty with R.

The most important thing I've learned so far is that syntax can be an unforgiving master to serve. Excel will give you some leeway between upper and lower case, for example. But R is exacting for every piece. 

But, hey, I've survived the first week in good stead...and that's 25% of the course. I feel more confident (even if it's a false sense) than I did when I signed up for this. Maybe I really can do this.

Introduction to Infographics and Data Visualization
Some of you may remember posts on other data-minded blogs this fall about this course led by Alberto Cairo. This will be the second offering, starting on Saturday, January 12 and wrapping up on February 23. This time, it's bigger (6K students) and has a few more tools available.

From the syllabus: "This course is an introduction to the basics of the visual representation of data. In this class you will learn how to design successful charts and maps, and how to arrange them to compose cohesive storytelling pieces. We will also discuss ethical issues when designing graphics, and how the principles of Graphic Design and of Interaction Design apply to the visualization of information. The course will have a theoretical component, as we will cover the main rules of the discipline, and also a practical one, as you will learn how to use Adobe Illustrator or Tableau to design basic infographics and mock ups for interactive visualizations."

I'm totally psyched about giving this one a try. I'm excited about learning the basics of Illustrator. I've played around a bit with Tableau before, but this will give me a reason to go back and dive deeper.

Data Analysis
Because the overlap in the first two courses is apparently not enough for me, this course also starts this month (January 22) and then runs for 8 weeks. So, there will only be one week where I will have to juggle all three...and some time when I just have this one to manage (assuming I don't sign up for anything else). This one is a complement to the R programming class I've already started, and is taught by Jeff Leek, who is also from Johns Hopkins.

This course is billed as "an applied statistics course focusing on data analysis. The course will begin with an overview of how to organize, perform, and write-up data analyses. Then we will cover some of the most popular and widely used statistical methods like linear regression, principal components analysis, cross-validation, and p-values. Instead of focusing on mathematical details, the lectures will be designed to help you apply these techniques to real data using the R statistical programming language, interpret the results, and diagnose potential problems in your analysis. You will also have the opportunity to critique and assist your fellow classmates with their data analyses."

I like stats, but it has been awhile since I have flexed those muscles. Not as long as it has been for programming, fortunately. One of the reasons I am interested in this class is the chance to work with bigger data sets, while applying my nascent R skills and reawakening my statistical knowledge. It's a good application of things. 

I'm hoping that I won't be a MOOC dropout. I also know that I've signed up for a heavy dose of learning at a time when I have a ton of travel for work and several projects due. But Opportunity knocked and I've chosen to invite her in to stay for a bit. If she starts making a pest of herself, I'm giving myself the option of evicting her. These courses will be offered again. I can catch her on another round.

Are you taking any (or all) of these courses, too? I have a couple of study buddies lined up for the first two courses, but the more the merrier! What else are you learning this year?

Thursday, January 3, 2013

Spotty Past

By now you've probably seen the Census Dotmap that everyone is talking about. It is "a map of every person counted by the 2010 US Census. The map has 308,450,225 dots - one for each person." When you look at it holistically, it's kinda cool, but you might not feel like there are any particular insights.

Let's see, the east side of the US is more heavily populated than the west. People love to live along coastlines. You can pick out metropolitan areas and assign them a name with ease. In some ways, it's not very different than some other maps we've seen...like the one of the US at night.

Source

But I like maps. I think there are stories in them. And I'd like to tell you one based on this particular point.

Click to embiggen, if you don't believe there's a town there.

I know, it's too small to see at this scale, but at the end of that arrow is the town where I grew up. So, here it is up close:

You are here.
Remember, each of those dots is a person---about 6000 of them. And when I look at this, I not only "see" the neighborhoods where my friends once lived, but also something of the topography. Can you tell where the main road (and train tracks) go through town? Can you tell where the university is, with its abundance of students? Would it surprise you to learn that there's a mountain at the southeast edge of town (where the dots line up, but go no further)? Even without the street labels, I can make a pretty good guess of where my mother's house is, because there is an empty space on the map for the elementary school---just a block away from the house.

Does this help?


What about this? You can definitely see the mountains better.


The interesting thing to me that the Census Dot map does is that while it doesn't hold surprises at a large-scale, the more I poke around in different towns, the more small-scale questions I have. I see things with this map, in terms of use of space and concentrations of population, that I can't see with the other maps.

Useful or not for schools? I think it's another tool in the arsenal. What do those distributions of population tell you about the needs for access to public services---and is that happening? What about arts and culture? School buses are getting pretty sophisticated these days with GIS data, but I still wonder if there is something to learn from a look at population. What would this map tell us about the community we serve?

Go play and tell me what you divine from the dots: past, present, and future.