Showing posts with label VBA. Show all posts

Monday, February 27, 2012

Generating Reports from a Gradebook

Back in November, the following comment was left for me:
I have a question, though. The current gradebook has one sheet for the dashboard, and it is possible to flick through the various students one by one. What about if I wanted to be able to see the dashboards for many students? I like the idea of having a single dashboard so that I can keep customizing the report as needed, but is there a way of then exporting this to generate 30 individual sheets for the different students in my class? In other words, hit PRINT once instead of 30 times...

Fabulous question, of course. I didn't know the answer to it at the time, but have had it on my "to do" list. Then, Debra Dalgleish shared this fabulous post last week about how to Filter Excel Data on Multiple Sheets. Although the information wasn't exactly what I was needing, it showed me that finding an answer for the commenter was possible. I just had to push a little further. A little Googling led me to this post on Using Excel 2007 for Progress Tracking in the Classroom. Huzzah! The perfect model to poach.

I copied the VBA from the Progress Tracking post into my Beginner's Gradebook, and then changed it only enough to suit my own named cells/ranges. Now, I will tell you that what I know about VBA would fit in a thimble. I'm eager to learn, but my lessons are currently being driven by "What do I need to know right now?" rather than any sort of organized manner. If you have some expertise you are willing to share to tweak the code to make things work more smoothly, I welcome any and all suggestions.

Here's how things are currently set up. In the "Scores" worksheet, I have added a data validation list (in grey box) that has the last names of the students. This cell was assigned a name. There is also a "Run Reports" button associated with the VBA shown below. In the "Report" worksheet, I had to make a couple of changes. First, I removed the data validation list associated with the last name. Why the data validation works in the "Scores" worksheet, but not the "Report" worksheet when the VBA runs is a mystery to me. Beyond that, I had to name the cell in the report with the last name, and use a formula to make it equal to what I named the cell with the new data validation list.

I'll put the VBA  code below, in case anyone has any suggestions. With very few exceptions, it is identical to the one in the Progress Tracking post by Danny Khen---definitely not my work. But for now, feel free to download the workbook and give things a try. It is a macro-enabled workbook, so be sure to tell Excel it's okay to play with. When you click on the "Run Report" button, a new workbook will open and populate with a separate report for every student, all on their own worksheets. All of the data will be in their places with bright shiny faces. It's magic! (Where's Doug Henning when you need him?) All you need to do is tell Excel to print the entire workbook and you're good to go.


Wednesday, November 30, 2011

Making It Up As I Go Along

Necessity is known as the Mother of Invention. What is less well-known, however, is that she is also responsible for a son: Justin Time. Over the years, Invention’s attention-seeking behaviors and drama queen ways have meant that Justin has labored away in obscurity. But no more. Today we celebrate Justin Time and his contributions to new learning. Without him, I might never have been prodded into developing my first Excel project using VBA.

For those of you Excel Ninjas out there who wield VBA like a weapon, my paltry excursion will not look like much. But we all have to start somewhere…and these are my humble beginnings.

One reason why Justin has not been given proper credit is that he is more commonly known as “You want me to do what? I don’t know how to do that.” But his advantage is that with Justin, you only have to learn something new to you---not new for everyone. And this is what I realized when I was asked to replicate the function of this website using Excel:


It’s a calculator for schools/districts to use to figure out one variable (number of tests, number of computers needed, number of test sessions, number of test days) if they know the other three. The calculations themselves aren’t all that sophisticated. The first variable (number of student tests) is the product of the other three. So, a bit of basic algebra will tell you how to calculate the others.

In Excel, each of the buttons you see—such as “Calculate Minimum Days of Testing Required”—needs to be assigned to a different formula. And, we need some way to update the information when schools want to test out different scenarios (e.g. change the number of test sessions from two to three). It’s possible to do something similar without resorting to writing your own macros. You could use a dropdown menu to allow users to pick the variable they wanted to calculate, then populate a table below based on that (fill in the other variables, assign a formula). But the people who wanted this calculator wanted something sexy. They wanted Justin.

I started by setting up the basic layout of the calculator. I found out later that this is extra important, because when you move cells around on the worksheet, the formula in VBA does not autoupdate the way a formula within the worksheet will. It’s not an insurmountable issue. It just means you’ll have to go back and update some of the code. Whatever you can do to plan ahead now will mean less work later. So, here’s what I’m starting with:
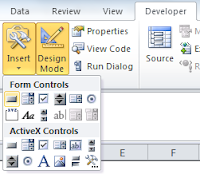


For the next part, I needed Justin Time. So, here is what he taught me about creating the buttons (you can read about my learning-to-learn strategies here). On the Developer ribbon, click on Design Mode in the Controls area. Then click on Insert. This will bring up a menu of items you can use to build a form. If you’ve created a form in MS Word, then this part won’t look new to you. Then, click the item in the upper lefthand corner to create a button. Draw your button on the worksheet. Don’t worry too much about getting the size or other attributes right. You can go in and make changes later. When Excel brings up a dialog box to assign a macro, hit “Cancel” for now. We’ll go back and deal with this after we create the macro. You’ll now have a generic box like this one to use:


Now comes the fun part. It’s time to write the code. On the lefthand side of the Developer ribbon, you’ll find the “Visual Basic” button. Be brave and click it. It will open up a new window where you can tell Excel what to do. We will then assign this code to the button on our worksheet. In the VBA window, click Insert and then Module. This will open another window for you to place the code. Here is what we are going to write:


“Sub” at the beginning stands for “subroutine.” (We all live in a yellow subroutine…) The word “students” follows in order to name this subroutine. The second line tells Excel what to do. Range(“C2”) tells Excel that we want things placed in cell C2 of the worksheet. We then say to execute a Formula. Finally, we have to include what that formula will be. This looks like a formula we would write for the worksheet itself: =C4*C6*C8. Notice the placement of quotation marks and the use of two equals signs. Finally, we tell Excel that we have reached the End of the Subroutine (End Sub).


Now we’re ready to assign the module to the button on our worksheet. Right-click the button and select “Assign Macro.” You should see the “students” macro. Select it and click “OK.” Your button is now ready to use. Fill in the other three variables and see what happens. Don’t like the name “Button 1”? Right-click on the button and edit the text. You’re ready to build the modules for the other three buttons.

Keep in mind that when you save this workbook, you need to save it as an Excel Macro-Enabled Workbook:


Uh-Oh
I discovered that after you calculate one of the variables and then clear out the box, you get ugliness like this:


And this is where Justin let me down. I tried inserting IFERROR as part of the formula statement in the macro, and Excel barfed it up. I looked and looked to find out why or what I could do instead and didn’t have any luck. At least not yet. If you have VBA wisdom to share about this issue, I’d appreciate learning from you.

My workaround was to create a “Clear Contents” button so that users could start over. This one I built a little differently. In the Developer ribbon, I selected “Record Macro.” This brought up a new window where I could name the macro (e.g. “Clear Contents”). Then, I used control+click to select cells C2, C4, C6, and C8, then hit the Delete button on my keyboard. After that, I clicked on “Stop Recording.” Now, I could associate the macro with the Clear Contents button, just like I did the other buttons.


Here is the link to download the completed workbook, if you need a place to play around with the VBA and don’t want to torture your own spreadsheet.

Invention may get all the credit out there---and she deserves some of what occurs when Necessity comes knocking at our door. But don’t forget about Justin Time and the learning he provides along the way. I’m hoping, however, that Necessity will find out about family planning in the near future.

Friday, September 9, 2011

Everything Old Is New Again

In high school---I think it was my sophomore year---I ended up in a computer science class. Keep in mind that this was the mid-80's. The Earth was still cooling in terms of the personal computing age. I don't really know how I ended up in such a class, other than going to a very small school (had 59 people in my graduating class) meant electives were few and far between. This is not to say the experience was regrettable, just the things one notices when one is 15 are not always the most meaningful. For example, the teacher loved coffee and cigarettes and we were forever offering mints and gum in those desperate moments when we had to ask for help with our BASIC programming. I can still smell her breath every time I think about that class. And I have been thinking about it a lot this week. I finally broke down and bought my first guide to Visual Basic for Applications (VBA). My job is not centered around Excel, but I am reaching a point with a couple of projects where the formulas are getting ridiculous. When you need a dozen just to generate the right data for a simple bar graph, there has to be a better way. VBA is an evolution of the BASIC programming language. So, as I launch into this next phase of learning, I'm glad to see that it's my class from high school, all grown up (even if I am not) and sweet smelling.
Fast forward five years, when I am now a college graduate (srsly). The DOS star is rising from the Pacific Northwest. Windows has yet to be invented. If you wanted to use a computer program, you also had to know enough DOS to be dangerous. Do you remember how you could use an asterisk to search for files? (If you are too young to remember, I don't want to know.) The asterisk was the ultimate Scrabble blank. For example, "*.doc" would show you all the files with that extension, regardless of how many (of the 8 maximum possible characters) came before the extension. So much more handy than "?," which acted as a one-character wildcard.

Maybe you've forgotten about this, but Excel has not. And you know what? It makes for a pretty handy search item. I got to whip out this trick this week when a few of us were considering Excel as a tool to collect and organize some data.

How It Works
Use the "*" in a COUNTIF formula where you're not sure how many times something occurs. COUNTIF uses a range (for example, a column of data) and criteria (either numbers or text) and gives you a total. The formula looks like this: =COUNTIF(range,criteria) Let's say you've been using Excel to keep a record of students' behaviour in your class and you want to find out if the number of tardies has been reduced. You can use the COUNTIF function to find all of the instances.

What It Looks Like
Your records would be more extensive than this---a mix of observations over a given time period. But for example purposes, this will do. I have five records with the word "tardy" in a mix of places. You can see the formula in the formula bar at the upper right and the result in the highlighted A7 box.

Uh-oh. Excel didn't find any of the words "tardy." WTF? I can totally see the word "tardy." But Excel doesn't. It's looking for the word "tardy" all by its lonesome---not in a crowd of words.

This is where the * comes to save the day. We can place the symbol at the beginning of the text string to find all of the instances where the word "tardy" occurs last:
Or at the end of the string, to find all the instances where the word "tardy" is first:
Or we can go both ways, so to speak, to find all the cells which have the word "tardy" anywhere in them:

If you're wondering if the formula is case-sensitive, it's not. Look at cells A2 and A4 now, as well as the result of using the COUNTIF function.

What other uses for this little formula can you think of?

Bonus Round
You can also add conditional formatting to highlight the instances for you, for example all the times first period is mentioned: